How to Fix a Car Air Conditioner in 5 Simple Steps
To fix your car air conditioner, first check the refrigerant level by attaching a gauge to the low-pressure port. If it reads under 30 PSI, that means it’s low.
Next, test the compressor’s clutch engagement and voltage. Then, inspect and clean the condenser fins and cabin air filter to clear any blockages.
After that, check the fan motor’s operation using a multimeter to see if there’s continuity. Finally, verify the blend air door moves correctly to regulate the temperature.
Follow these steps for effective cooling, and you’ll find detailed procedures to fully restore your AC.
Check Your Car AC Refrigerant Level
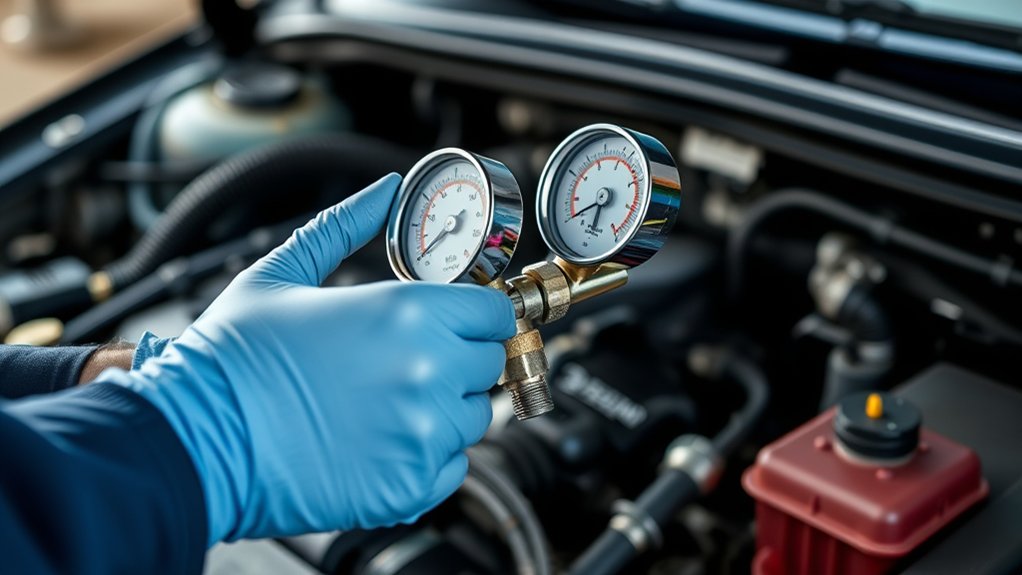
To check your car AC refrigerant level, start by locating the low-pressure service port, usually marked with an “L,” and carefully remove its cap.
Next, attach a pressure gauge to this low-pressure port. Before taking any readings, run the AC on high for 3-4 minutes to make sure the refrigerant circulates properly throughout the system.
Now, take a look at the gauge. If the pressure reads below 30 PSI, it usually means the refrigerant level is low and you’ll need a recharge. If it’s between 0-15 PSI, that definitely shows a significant refrigerant deficiency.
For the most accurate reading, always check a pressure-to-temperature chart. Match the ambient temperature to the right PSI levels.
This step-by-step check helps you know exactly when your AC system needs more refrigerant.
Test Your Car AC Compressor Function
When you start the engine and set the AC to its coldest setting, watch to see if the compressor clutch engages and spins. If it doesn’t, grab a multimeter and check for about 12 volts at the AC compressor connector to confirm there’s power.
Start the engine, set AC to cold, and check if the compressor clutch engages before testing voltage with a multimeter.
Next, listen carefully for any strange noises like clicking or grinding. These sounds usually mean there’s internal wear or damage.
Then, measure the pressure at the low-pressure service port using manifold gauges. If the reading is between 0 and 15 PSI, it could mean there’s not enough refrigerant or the compressor is failing.
If the compressor still won’t engage but the voltage is good, check the relay and fuses for any electrical issues.
Testing the AC compressor step-by-step like this helps you accurately figure out if the problem is mechanical or electrical, so your car’s cooling works properly again.
Inspect and Clean the AC Condenser and Filter

Begin by thoroughly inspecting the AC condenser for any debris, damage, or blockages that could impede refrigerant flow and reduce cooling effectiveness.
Use a soft brush or compressed air to clean the condenser fins carefully, removing dirt and obstructions that decrease airflow.
Next, check the cabin air filter located inside the vehicle’s HVAC system. A clogged filter restricts airflow, reducing the AC’s performance.
Replace the cabin air filter every 12,000 to 15,000 miles or annually to maintain peak air quality and system efficiency.
Keeping both the AC condenser and cabin air filter clean guarantees proper refrigerant flow and airflow, which are critical for effective cooling.
This methodical inspection and cleaning will help restore your car’s air conditioning performance before moving on to other diagnostic steps.
Check the Fan Motor Operation
Although the fan motor often goes unnoticed, it plays an essential role in circulating air and maintaining cabin cooling. Without a properly functioning fan motor, air blowing through your vents can be weak or nonexistent, which makes effective AC repair a challenge.
To check the fan motor operation, follow these steps:
- Locate the fan motor, typically near the engine compartment front or dashboard, making sure it’s easy to access.
- Listen for unusual noises or notice if the air blowing is intermittent or absent. These can be signs of motor failure.
- Use a multimeter to test electrical continuity. If there’s no continuity, it usually means the motor needs to be replaced.
Regularly inspecting the fan motor and wiring helps prevent airflow issues. That way, your car’s air conditioner stays efficient and reliable.
Check If the Blend Air Door Is Stuck
Since the blend air door controls the mix of warm and cool air in your vehicle’s cabin, a stuck door can cause continuous warm air output despite setting the A/C to cool.
Begin by locating the blend air door, usually deep behind the dashboard, which may require partial disassembly. Listen for unusual noises when adjusting climate settings, as these can indicate a malfunction.
Next, test the door’s movement manually or via the actuator to confirm if it’s stuck. Persistent warm air blowing signals the door isn’t regulating properly.
If you find it stuck or damaged, repair or replace it to restore your heating and cooling system’s efficiency.
Fixing the blend air door issue is essential for maintaining consistent and accurate cabin temperatures.
It’s one of those things that can really make a difference in how comfortable you feel inside your car. So, it’s worth checking out if you notice your A/C isn’t working like it should.
Frequently Asked Questions
How Often Should I Service My Car Air Conditioner?
You should follow an AC maintenance frequency of at least once a year to keep your system running efficiently. Regular servicing helps you catch common AC issues early, like refrigerant leaks or clogged filters.
Try using some DIY AC tips, such as checking the cabin air filter every 12,000 to 15,000 miles and keeping an eye on how well the cooling is working.
It’s also a good idea to schedule a professional inspection every 2 to 3 years. This way, you’ll get thorough diagnostics and avoid costly repairs down the line.
Can a Car AC Leak Be Fixed Without Professional Help?
Yes, you can fix a car AC leak without professional help through DIY repairs if the leak is minor.
Start by checking for oily residue or use UV dye and a UV light to find the leak exactly.
Next, replace any worn O-rings or gaskets to get the system sealed up again. This can really help restore the AC’s performance.
Just keep in mind, fixing airflow issues caused by leaks will make your cooling more efficient.
But if the leak is big or complicated, it’s best to get a professional to handle it for a complete and safe repair.
What Type of Refrigerant Is Best for My Car?
You should use the refrigerant type specified in your vehicle’s manual or under-hood label to avoid compatibility issues.
Most modern cars use R-134a, which balances performance and environmental impact well. Newer models may require R-1234yf, as it has a lower global warming potential.
Using the wrong refrigerant risks system damage and legal penalties.
How Can I Tell if My AC Compressor Needs Replacement?
You can tell if your AC compressor needs replacement by performing a compressor noise diagnosis.
Listen for clicking or whining sounds.
Next, do a refrigerant pressure check using a manifold gauge.
Low discharge pressure usually indicates failure.
Look for symptoms like lack of cold air even when refrigerant levels are proper, oil leaks around the compressor, or the compressor not engaging.
These signs often point to the need for a replacement.
Is It Safe to Recharge My Car AC Myself?
Thinking of a DIY Air Conditioning recharge? Yes, you can do it safely if you follow strict safety precautions. Always wear goggles and gloves.
And never fill through the high-pressure port.
Common mistakes like ignoring system leaks or misreading pressure gauges can cause damage or injury. So, always confirm that no leaks exist before you start.
Use the correct pressure readings before adding refrigerant.
With a bit of precision and care, recharging your car AC yourself is both feasible and safe. Just take your time and follow the steps carefully. You’ve got this!
Conclusion
You might think fixing your car’s AC is rocket science, but it’s really just about these five straightforward steps. Checking refrigerant, testing the compressor, cleaning the condenser, verifying the fan motor, and ensuring the blend air door moves freely will often do the trick.
So, before you start imagining a pricey mechanic bill, try this methodical approach. You’ll find that cooling your ride isn’t as complicated as it seems.